Tag Archives: blogs

Playing with my knitting machine

Standard
Playing with my knitting machine

I’m finally starting to come out of my latest adventure…spinal surgery!! YAY…not.  I was expecting the surgery itself to be way worse than it was, but it wasn’t horrific.  Granted, feeling staples brush against the vertebrae in your back is not a good time.  It’s been slow but the incision is finally healing.  The nerve damage from the blown disc pinching off my S1 and S2 nerves for 9 months will take longer to heal, if it ever heals at all.  I hope I finally heal completely because walking with a cane really sucks.

The worst thing about the whole thing was that I couldn’t sit for more than 10 minutes at a time (and then I had to sit in a reclined position), thus I COULDN’T KNIT!!!!  It really stunk but I found a way around it; I had the fore-site to elevate an old card table and dug out an old Bond Knitting Machine, that I’ve had for years, and set it up.  About two weeks after the surgery, I was standing and walking so I designed a simple baby blanket that I could make; it wasn’t exactly like knitting but it was the best I could do at the time. The good thing was that I was able to gauge it out to a hand knitting pattern.

If you’d like to have this pattern, it can be found at:

https://www.etsy.com/shop/CapeCodStitchery

~or~

http://www.ravelry.com/stores/cape-cod-stitchery

long viewcable close upfolded close up

Chunky Yarn Baby Blanket in Stars

Standard

Hello everyone!  The good thing about winter is that there is plenty of time to knit and I’ve been busy.  My latest is a chunky yarn knit baby blanket that has the illusion of stars in it, or snowflakes (I’ve heard both…) in charcoal gray.

To  get a copy of the pattern, please feel free to visit my Etsy store at:

https://www.etsy.com/shop/CapeCodStitchery

Thanks!!!

Dixie


Knitted cubes, in 3D

Standard

I thought I would share my latest design; a reversible knit and purl baby blanket knitted in a stunning spice red, chunky yarn.  Very soft and appropriate for an evening out with Mom and Dad!

This pattern is available, along with many others, at:

https://www.etsy.com/shop/CapeCodStitchery

Thanks for stopping by!

Dixie

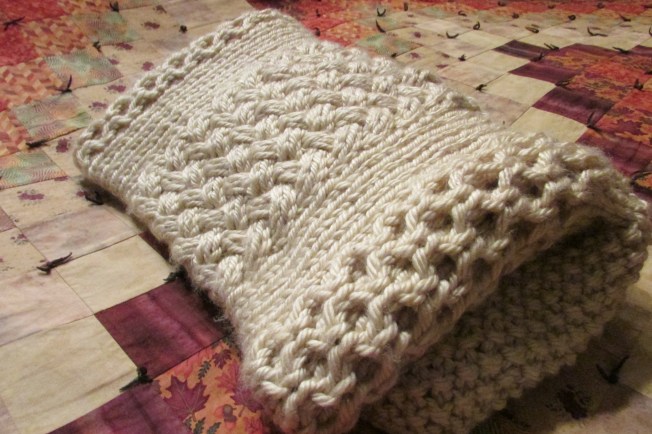
Honeycomb and basket weave cable knit baby blanket

Standard

Hello everyone!  I’m glad to say that I’ve rolled out another baby blanket pattern at Etsy and I’m very happy with how it turned out.

IMG_1039IMG_1024IMG_1026IMG_1032IMG_1036

It’s is knit with chunky yarn, on bigger needles, and it’s irresistibly fluffy and so soft!  Not only was it a pleasure to make, it’s an heirloom item that can be treasured for years, long after the little one has grown out of it.

If there are any questions, please feel free to comment or send me a private message.  Otherwise, please check out my Etsy store, Cape Cod Stitchery, not only for this pattern but for the others that have already been posted.

Thank you!


I’ve expanded my “project” for making patterns for my knitting and crocheting!!

Standard
Banner for Cape Cod Stitchery; where my pattern designs will reside.

Cape Cod Stitchery; where the information regarding the knitting and crocheting patterns designs will reside.

Hello to my faithful followers!  I haven’t been around for a little while, because I’ve been a bit busy working on my latest project; not only have I been creating more baby blankets but I’m now actually writing down the patterns for the projects that I’ve designed and am in the process of creating PDF’s from them for publication and putting them up for sale (for a reasonable price even though they take quite a bit of time to create) on Etsy and Ravelry.

There are two main reasons for why I decided to finally make my own patterns.

First, and most importantly, I’ve discovered that the patterns that I see published in knitting/crocheting magazines look very complex and more time goes into deciphering the pattern than goes into creating it.  I guess that’s why I decided to start designing my own creations…it was just easier to do. Fairly recently, the software to create professional looking knitting and crochet charts has become obtainable, by people like me, who have enough of a working knowledge of graphics design to be able to make written charts and patterns clear and easy to follow.  This is so anyone that has a basic working knowledge of knitting and crocheting can accomplish them without frustration.

Secondly, I’ve discovered by looking at my own creations, that making something beautiful doesn’t need to be ridiculously hard to do.  I’ve had several people tell me, over the years, “That blanket looks so difficult to make, I can never do that!” even after I assure them that the projects are actually easy to do.  Since the “pattern” was in my head, trying to explain how to do it was nearly impossible.  I’ve resigned myself to making patterns that are not only clearly explained, with a chart provided if the project can be simplified by creating one, but to also provide step by step instructions (with images) of how a stitch is made.  I’ve also figured out how to create videos, for posting on YouTube, explaining the process as well.

With that said, designing and publishing simple and easily explained knitting and crocheting patterns is my objective.

I’m very close to posting my first pattern, that hasn’t been posted yet but will be shortly, so I’ve created another blog specifically for knitted and crocheted projects that I make, and sell, patterns for: http://capecodstitchery.com/; please pop over and take a look!  This is an image of the first blanket that I’m making a pattern for; a herringbone stitch baby blanket in sage green and off white stripes with an I-cord edge:

cropped herringbone blanket

I will still post my personally made projects here on Etch Stitch and Burn so please continue to pop in, from time to time, to see what I’ve been up to.

Thank you for all of the support!

Another long absence but I’m back!!

Standard

Remember when on the last day of December, New Year’s Eve, when you’re sitting around with your family and waiting for the new year to come, the discussion always heads towards “I hope next year is better than this year!”

Well, it hasn’t been so far.  Actually, it’s been one step left of brutal.

The first of the year kicked off with a massive snowstorm that hit the New England and then I deployed to the Midwest for four months.  The time within the four months consisted of:

1.     Unyielding snow storms and bone chilling cold that didn’t let up.

2.     Complete homesickness being away from my husband (and my dogs) for so long.

and the worst one…

3.     My precious father passed away before our eyes.

Needless to say, I haven’t been feeling all that creative and crafty lately.  However, as it is said, “when God closes a door, he always opens a window”; a window opened after being consumed in the fog of loss and grief for my Dad.  Don’t get me wrong, I’m still hurting but a spark of my former self has returned, thanks to my husband, friends and family.

The first shot in the arm was that I decided to go back to college, thanks to the provocation of my friends.  I’m 6 weeks into my first class and I’m pulling a 98.2%; not too bad for an old lady such as myself.  The second is that it’s come to my realization that I’ll be eligible for retirement in the next 4 – 5 years and that I’d better start laying the foundation for what I’m going to be doing once retirement happens.  Knowing that once retirement occurs, my hubby and I will escape into the wilds of somewhere but a concrete fact remains that we are both technology geeks so wifi will be there…so I’m returning to the world of blogging.  I don’t know what I’m going to do with it but it’s time to give it a go again.

So, for my loyal followers that wondered what happened to me, I’m back and will do everything I can do stay relevant again.  Please forgive me, it’s been a really tough year…

I really don’t like winter…

Standard

My apologies, I haven’t had the ability to be very creative lately.  Don’t get me wrong, the ambition is there and I’m  still thinking about my newest project on an hourly basis but the stars haven’t alined properly for me to do so.

Shortly after finishing my last project, I started another one (a different style of snowflake ornament) in order to try and expand a color pallet for the inlay.  However…it was really cold!  Unbearably cold actually! It was impossible to be comfortable enough in my workshop to put in any time at my scroll saw.  That lasted for few weeks.

Once the clouds were parting on the arctic blast around here, I felt the pull towards the workshop again.  But alas…we got a blizzard here on Cape Cod last weekend!  I hadn’t been in a blizzard for a really long time so I’d forgotten how frustrating they could be.  The 1 1/2 feet of snow was frustrating enough along with the limited mobility (even though my husband and I both have 4-wheel drives) but losing power for 2 1/2 days was massively annoying!  Granted, we did better than most; we had heat, hot water, radio and light (in a limited capacity) due to the generator.  So many people had to leave their homes because they had nothing.  We even had one evening where we ran an extension cord from the bathroom, into the living room, in order to watch the movie “Army of Darkness” on my laptop with long retired speakers (I’m not even sure where they came from, only that I still had them) while cooking Ramon noodles in an old pan on the woodburning stove.  It wasn’t an ideal evening but we were cozy.

Anyway, the power returned and life went back to normal again so I’m hoping to get some saw time in this weekend.  I’ve been experimenting with different mediums to color resin with and I think I may be onto something.

Hopefully, I’ll have another entry coming soon.

I did it!!! My vision is a reality!!!!

Standard
I did it!!!  My vision is a reality!!!!

So, maybe I’m overreacting a bit but I’m completely ecstatic about what transpired for me today…allow me to explain.

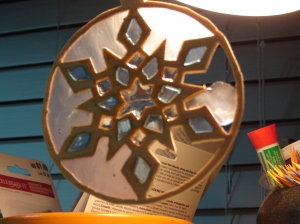
I explained in my last entry that my hubby had given me a scroll saw this past Christmas.  After much frustration (the people that scroll saw the signs at county fairs make it look incredibly easy!), I finally produced a completely jacked-up snow flake Christmas ornament.

my pathetic first attempt at scroll sawing anything

my pathetic first attempt at scroll sawing anything

Yea, it’s horrible…I know it.  It frustrates me that I didn’t do better at scroll sawing on the first attempt (normally, I can pick things up with little effort…not this time) but, I had to start somewhere.  I’m going to have to practice in order to take this further but it’s so worth it after what I was able to accomplish today!

After I took this picture, I put clear packaging tape on the back side (the worst side, actually…) and burnished it down so the resin wouldn’t leak out when I poured it.  Then I placed it on a paper plate with the tape on the bottom leaving the top open.  Then I mixed the clear resin and tinted it with oil pigment and poured it into the openings.

the resin is still wet and incredibly stinky!!!

the resin is still wet and incredibly stinky!!!

So I mixed, and I poured…and I stunk up the house with noxious fumes.  In this picture you can barely see the tape peaking out of the parameter of the ornament but that’s the only thing keeping the resin from pouring our all over the place.   In very simple terms, I’m trying to create a sun catcher (even though my end product is going to be much more elaborate) because I want to be able to back light the resin to make a stained glass effect. Well…it worked!!!!!!!!!

the ornament holding onto the resin without a tape backing!!

the ornament holding onto the resin without a tape backing!!

I put a fairly high ratio of hardener into the resin in order to get a really solid cure so after about 2 hours (it takes about 24 to completely cure) I carefully removed the tape backing to see if the inlay would fall out and it didn’t.  Sometimes the resin shrinks when it cures but so far so good.

I also wanted to be sure that I could maintain an element of transparency  (necessary in order to be able to have the desired effect in the final project…this was only an experiment) and the transparency remained!  I kept two of the sections open as a comparison to the filled sections to see if there would be a notable difference (I was only going to leave one section open but I ran out of the opaque blue and didn’t want to mix any more…the fumes are intense) and there was an obvious difference.

a different lighting, I'm very happy that the colors stayed vibrant after curing

a different lighting, I’m very happy that the colors stayed vibrant after curing

In closing, I’m blissfully happy about the results!  There are still a few bugs to work out (most notably my complete lack of skill in using a scroll saw at this time…) but I think I’m getting closer to being able to create a “stained glass effect” inlay in wood.

More projects to follow….

Resin Inaly in Wooden Box

Standard

my resin inlay experiementAfter much consideration and thought, I had found myself in a rut.  I enjoy crocheting and knitting but it’s not that fun to do when it’s hot as hell outside and oppressively muggy inside.  I enjoy creating the wooden boxes, that I’ve blogged about previously, but that project had also run it’s course.  Woodburning and painting was fun but “been there, done that”, I needed to find another direction to take my crafting…I was in a rut.

While surfing around the net one night, I stumbled upon the art of working with resin casting on You Tube.  The techniques documents were primarily for jewelry (pendents and bracelets mostly) and while it’s completely charming to imbed candy into clear resin and wear it around your neck for eternity…it really wasn’t my thing.  Then I found a video of a man that would put colored resin inlays into the neck of guitars; while interesting…I don’t play much anymore so that didn’t help either.

But I had a moment of enlightenment; is it possible to inlay colored resin into wood, or better yet…a wooden box?

So my quest for knowledge began.  I looked up everything I could on the internet about resin, casting resin, molding resin and coloring resin.  Again, it was mostly geared towards making jewelry (other than my wedding rings, I rarely wear it) so I began looking for resin inlay techniques for wood.  Amazingly enough, all I found was a single Acrobat document that was produced in 2009 for a woodworking magazine.  I was pretty much on my own for this one.

I began gathering the supplies that I would need to start my experiment; luckily I already had most of them (paints and colorants) but purchased the actual resin and mixing cups from a craft store.  The syringes were a bit tricky (thank God I don’t look like an intravenous junky) but I found a pharmacist that sold me 16 syringes for 10 cents a piece because they were expiring their useful date for medical use and they were going to be pitched anyway.
useful things for casting and coloring resin

I had a little wooden box, that I’d purchased for a dollar,  that had a lid that was about 1/2 inch think and perfect for my inlay experiment.   I got into my vast supply of clip art books and found a simple dog paw pattern that fit nicely on the lid.  After transferring the clip art onto the lid, I used a Dremel to cut a recess of about 1/4 inch into the lid (I didn’t want to cut through the top because the resin would run out).  After the cutting was finished, I made sure that the lines were clean so after the excess resin was sanded off, a clean inlay would remain.

After blowing off the sanding dust, I proceeded to mix the resin (you have to combine it with a catalyst in order for it to harden) and it stunk to high hell.  I didn’t want to just cast clear resin so I had some silver/grey powdered mica that I mixed in.  After I combined the mixture to my satisfaction, I used a syringe to fill the recessed areas on the lid of the box.  I actually overfilled the cut out area because there’s a slight shrinkage upon the resin curing (I’d only read about it…no actual experience in how much shrinkage would take place) and the syringe made it a very clean and tidy process; I intended to sand the resin down to be flush with the lid anyway once it was cured.

After the filling and the curing (I put the box with the un-cured resin under a lamp that put out some heat) and waited for 24 hours.  The next day, I hand sanded the box until the resin was flush and smooth.  The one disappointment I had was that the resin was quite dull and blended with the matte finish of the box, I was hoping for a glossy finish.  Easily solved!  I dug into my collection of paints and finishes and found a bottle of Triple Gloss Acrylic that I painted on to create the shine.

Overall, I’m encouraged and actively working on my next project…of course I will blog about it.  Keep an eye open on my blog; more good things will be posted soon!!!!
Thanks for reading!!!

Latest project…a box

Standard

First off….WOW!!!  The response to my lost blog entry was unbelievable!!  Who would have thought that eggs would be so interesting?  I’m still thinking that I need to start working on another one sometime soon but since I’m still working the night shift, it’s out of the question; way to noisy.

This is a “quiet” project that I’ve recently done.  My niece (my clone, actually…) has a birthday coming up this month and I thought she’d like it.  We have a little thing that we do since I live here on Cape Cod and she lives in Michigan…we actually write letters to each other!!  No, not emails or tweets or Facebook entries…write with a writing instrument and paper.  When I get a letter from her, I normally send her some homemade little jewelry thing, mostly necklaces.  So I figured that she needed a box to put them in.  I showed my sister (her Mom) these pics and she decided that she wanted it instead.  Ummm…no.  I’m making one for her too.  That will probably be the next entry.

Anyway, it was really easy to do and this is how I did it:

First off, I think I need to explain something.  I absolutely LOVE the Michael’s craft store!!  There are two of them sort of close to where I live (but they’re bringing one to Hyannis this summer so I’m very happy) and I go there whenever I can.  There are two places that I normally get my craft supplies; Ebay, if it’s for eggs and Michael’s if it’s for everything else.  This box falls into the “everything else” category.

1.  Go to Michael’s, in the unfinished wood section, and buy a box.  They come in all shapes and sizes.  Some even have the hinges and closures already there (like this one).  The best part is that they are very inexpensive (I think I paid 3 dollars for this one) and the possibilities are endless with a little imagination.

2.  Find some clip art that you like and trace it onto tracing paper.  This came from a clip art book I have with a bunch of mandala’s in it.  If you don’t know what a mandala is, I highly suggest you Google it…the images will blow your mind!!  I don’t use the originals from the book because they’re so pretty,  I don’t want to ruin them and may want to use them again.

3.  Take some regular graphite paper and trace the image onto the box.

4.  This is where it starts to get fun, at least for me.  The darkened areas that create the outlines isn’t paint…it’s wood burned.  Otherwise known as “pyrography”.  Again, Google if you want to get a little more info on it.  The applications are endless with the multiple tips that you can get for the wood burning tool.  And yes; you can buy them at Michael’s.  I like using the wood burning technique because I think it adds a beautiful, rustic feel to the piece.

5.  Once the wood burning is finished, I had to decide how I was going to paint it.  But I didn’t use regular paint.  I don’t think you can tell from these pics but the inside of the flower petals are bronze leafing (real metal).  The same as gold or silver leaf.  But, this stuff is called “Rubb ‘n Buff”.  It’s real metal leaf but it’s suspended in sort of a wax and can be applied with a paint brush.  It comes in about 15 different finishes and adds a very nice touch.  The rest of the “paint” is actually pigment that…I bought at Michael’s.  I didn’t want an opaque finish because I didn’t want to overwhelm the wood burning.  I watered it down until is was very thin, brushed it on and wiped the excess off with a paper towel.  I’m not sure but regular craft paint should work the same way.

6.  On the bottom of the box I glued 4 wooden balls to the bottom to act as legs.  Yep…got them at Michael’s!  The balls have one flat side to them so they can be glued on easily.

7.  Once everything is dry, I sealed the whole thing with a matte finish sealant.  Hubby thought a shiny finish would look good too.  I may have to try that with the next one.

Anyway, there you go.  One beautiful jewelry/trinket box!!  Quick, inexpensive and most importantly for me…quiet to make! LOL!!

Thank you all that have been following my blog!!  I’m humbled by the encouragement and kind remarks that I’ve received!!